Spring JPA::Master/Slave 분기처리(2)
업데이트:
지난 포스트에 이어 서비스와 테스트 코드를 작성해보고 @Transactional의 readOnly에 따라 DB 분기가 잘 되는지 확인해보도록 하겠습니다.
📌 모든 소스는 Github에 있습니다.
Entity
먼저 Post(게시글)라는 Entity를 하나 만들어 보겠습니다.
@Getter
@NoArgsConstructor(access = AccessLevel.PROTECTED)
@Entity
public class Post extends BaseTimeEntity {

    @Id
    @GeneratedValue(strategy = GenerationType.IDENTITY)
    private Long id;

    @Column(length = 255, nullable = false)
    private String title;

    @Column(nullable = false)
    private String content;

    private String author;

    @Builder
    public Post(Long id, String title, String content, String author) {
        this.id = id;
        this.title = title;
        this.content = content;
        this.author = author;
    }

    public PostResponseDto update(String title, String content) {
        this.title = title;
        this.content = content;

        return new PostResponseDto(this);
    }
}
getter가 있고 Builder 패턴을 사용했으며 update() 메소드를 통해 제목(title)과 내용(content)을 업데이트 합니다.
💡참고로
BaseTimeEntity는@CreatedDate와@LastModifiedDate를 사용하여 등록일과 수정일을 자동 등록해주는 클래스로 상속받아 등록일과 수정일이 자동으로 등록되도록 하였습니다.
❗DB에 등록된 데이터를 보니 제대로 데이터가 들어가있지 않았습니다. 원인 파악하여 업데이트하겠습니다.
Service
다음은 서비스 클래스를 작성해보겠습니다.
PostService에는 게시글을 id로 조회하는 findPostById() 메소드와 게시글을 수정하는 update() 메소드가 있습니다.
@RequiredArgsConstructor
@Service
public class PostService {

    private final PostRepository postRepository;

    @Transactional(readOnly = true)
    public PostResponseDto findPostById(Long id) {
        Post post = postRepository.findById(id)
            .orElseThrow(() -> new IllegalArgumentException("해당 게시글이 없습니다. id = " + id));

        return new PostResponseDto(post);
    }

    @Transactional
    public PostResponseDto update(PostRequestDto requestDto) {
        Post post = postRepository.findById(requestDto.getId())
            .orElseThrow(() -> new IllegalArgumentException("해당 게시글이 없습니다. id = " + requestDto.getId()));

        return post.update(requestDto.getTitle(), requestDto.getContent());
    }

}
findPostById() 는 @Transactional(readOnly = true)로 세팅되어있고, update()는 @Transactional만 세팅되어 있습니다.
💡참고로
@TransactionalreadOnly의 default는false입니다.
Test Code
마지막으로 테스트 코드를 작성하여 위의 Service 코드가 DB 분기처리가 되는지 확인해보겠습니다.
먼저 test를 위한 properties 파일, yaml입니다.
application-test.yml
spring:
  application:
    name: jpa-multidb-connection
  config:
    activate:
      on-profile:
        - test
  jpa:
    hibernate:
      ddl-auto: create-drop
    generate-ddl: true
    properties:
      hibernate:
        format_sql: true
        use_sql_comments: true
  datasource:
    master:
      driver-class-name: org.h2.Driver
      jdbc-url: jdbc:h2:tcp://localhost/~/master
      read-only: false
      username: sa
      password:
    slave:
      driver-class-name: org.h2.Driver
      jdbc-url: jdbc:h2:tcp://localhost/~/slave
      read-only: true
      username: sa
      password:

logging:
  level:
    org.hibernate.SQL: debug
    org.hibernate.type: trace
    com.citizen.multidb: debug
보시면, spring.datasource.master와 spring.datasource.slave에 대한 properties값을 작성하였습니다.
Test
💡참고로 test일 경우 properties 파일을 test 디렉토리의 resources 안에
application-test.yml(혹은 properties)가 있을 경우 그 properties 파일을 읽고, 없을 경우 원래 패키지안에application.yml을 읽습니다.
@ActiveProfiles("test") // -(1)
@ExtendWith(SpringExtension.class)
@SpringBootTest(webEnvironment = SpringBootTest.WebEnvironment.RANDOM_PORT) // -(2)
public class MultidbServiceTest {

    @Autowired
    private PostService postService;

    @Autowired
    private PostRepository postRepository;

    @BeforeEach // -(3)
    void setUp() {
        final Long id = 1L;
        final String title = "title";
        final String content = "content";
        final String author = "author";
        Post post = Post.builder()
            .id(id)
            .title(title)
            .content(content)
            .author(author)
            .build();

        postRepository.save(post);
        postRepository.flush();

    }

    @Test
    void 단건_게시글_조회_테스트_SLAVE() { // -(4)
        // given
        final Long id = 1L;

        // when
        PostResponseDto findedPost = postService.findPostById(id);

        // then
        assertThat(findedPost.getId()).isEqualTo(id);
    }

    @Test
    void 게시글_업데이트_테스트_MASTER() { // -(5)
        // given
        final Long id = 1L;
        final String updateTitle = "updated title";
        final String updateContent = "updated content";
        PostRequestDto postRequestDto = new PostRequestDto(id, updateTitle, updateContent);

        // when
        PostResponseDto updatedPost = postService.update(postRequestDto);

        // then
        assertThat(updatedPost.getTitle()).isEqualTo(updateTitle);
        assertThat(updatedPost.getContent()).isEqualTo(updateContent);
    }

}
(1) @ActiveProfile
@ActiveProfile에 “test”를 명시하였습니다.
(2) @SpringBootTest
Mockito를 사용하여 Service만 단위 테스트를 진행할 수 도 있지만 편의상 @SpringBootTest를 사용하였습니다.
(3) @BeforeEach
테스트에서 찾을 데이터가 필요하기 때문에 @BeforeEach를 사용하여 DB에 초기 데이터를 적재합니다.
(4) 단건_게시글_조회_테스트_SLAVE
Slave에 접근할 로직, postService.findPostById()를 호출하여 readOnly = true로 제대로 Slave에 접근했는지 확인합니다.
다음은 테스트 코드를 실행했을때의 로그입니다.
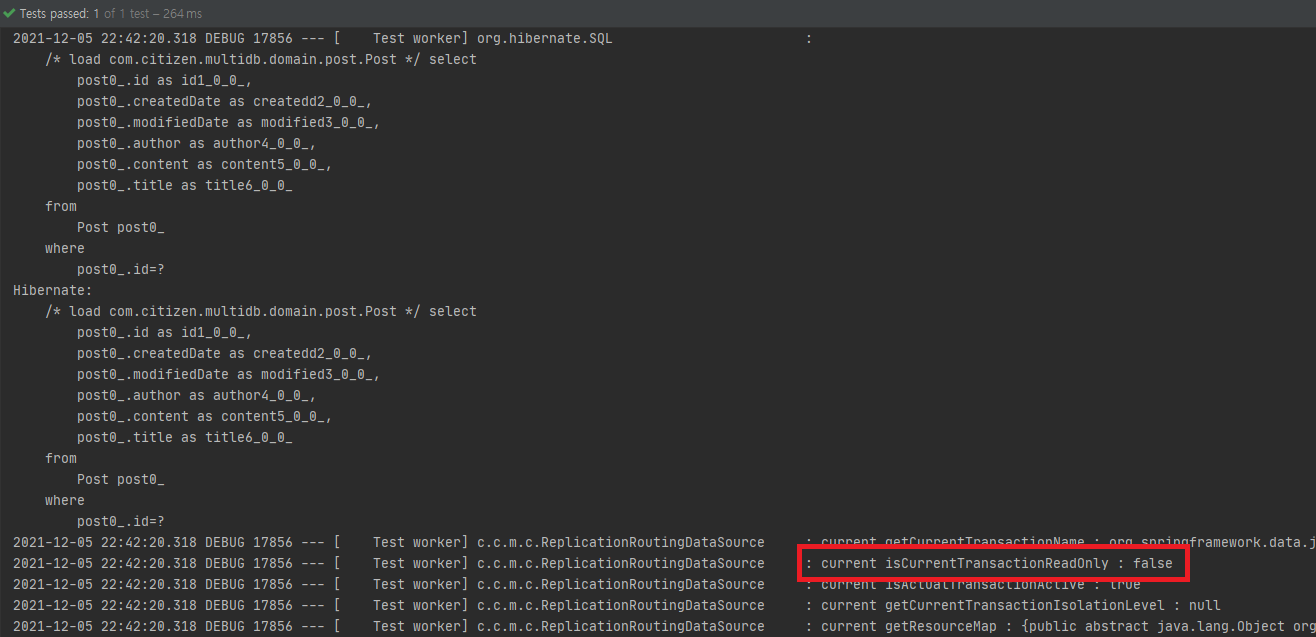
먼저, @BeforeEach에서 PostEntity를 하나 save()하기 위해 DB에 접근하는데, 이때 isCurrentTransactionReadOnly를 보면 default로 Master에 접근하여 false로 찍히는 것을 볼 수 있습니다.
💡insert 쿼리가 로그에 남지 않은 이유는 Jpa의
save()는 select → insert/merge로 진행되는데, 특정 id로 조회 후 Persistence Context에서 관리하고 이것이 insert하려는 Entity와 동일하다면 insert를 하지 않습니다.
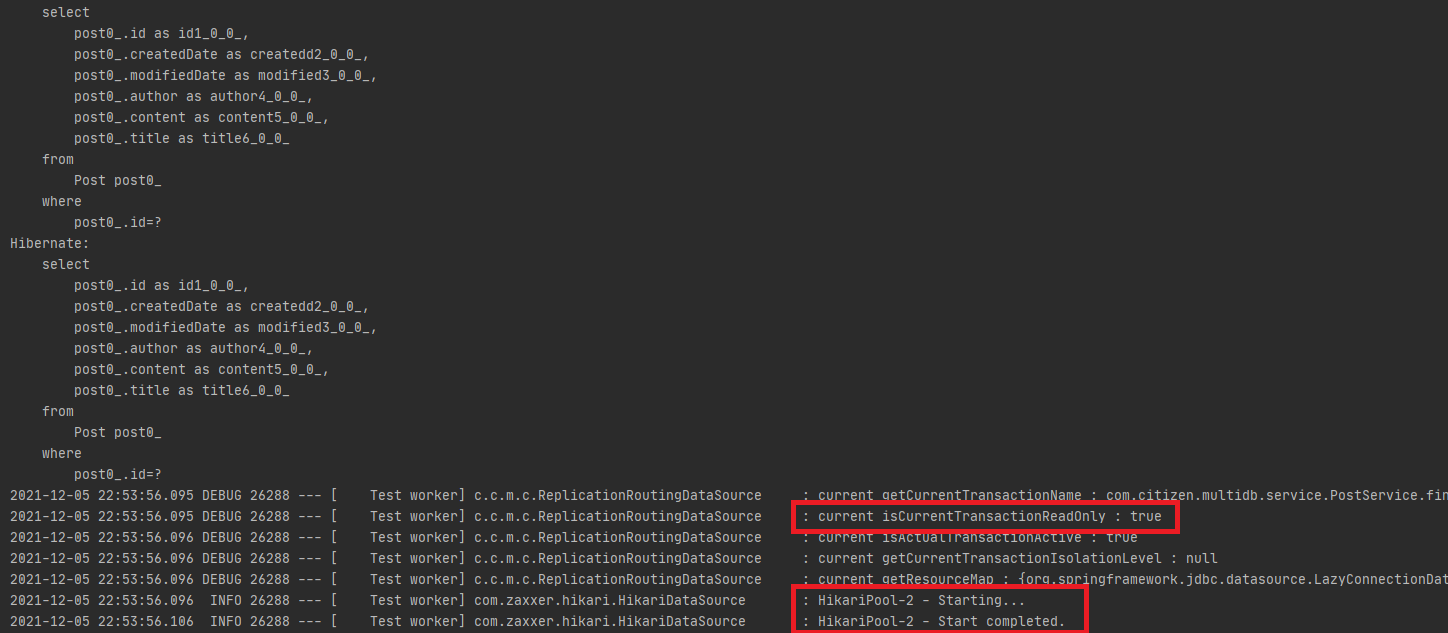
그 밑에 실제 postService.findPostById()를 호출한 로그를 볼 수 있는데, isCurrentTransactionReadOnly를 보면 default로 Master에 접근하여 true로 찍히는 것을 볼 수 있습니다.
💡한 가지 특이한 것이 밑에
HikariPool-2에 관련된 로그가 보이는데, 이는 추후 Spring Batch에서 접근할 DataSource 지정하기에서 보도록하겠습니다.
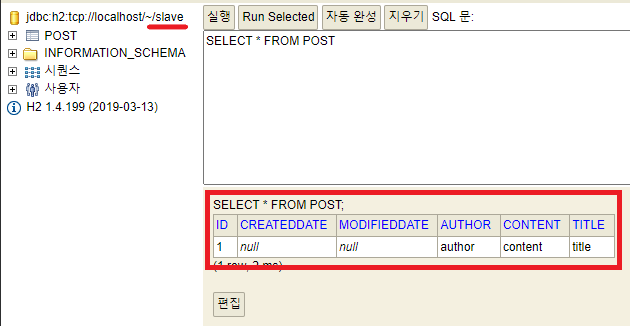
Master와 Slave DB에 가서 확인해보면 Slave에서만 데이터가 확인되는 것을 볼 수 있습니다.
❗제가 잘못한 부분이 있었습니다. DB 모든 데이터를 클린징하고 다시 테스트 코드를 구동하니 실패로 떨어졌습니다.
@BeforeEach에서 flush한 데이터는 Master에 적재되기 때문에 Slave테스트 코드는 실패로 떨어집니다. (왜 성공했는지도 다시 확인해봐야겠네요)
정상적인 코드는 다시 GitHub에 올리도록 하겠습니다. 😅
(5) 게시글_업데이트_테스트_MASTER
다음은 Master에 접근할 postService.update()를 호출해보도록 하겠습니다.
테스트 코드를 실행해보면 다음과 같은 로그가 보입니다.
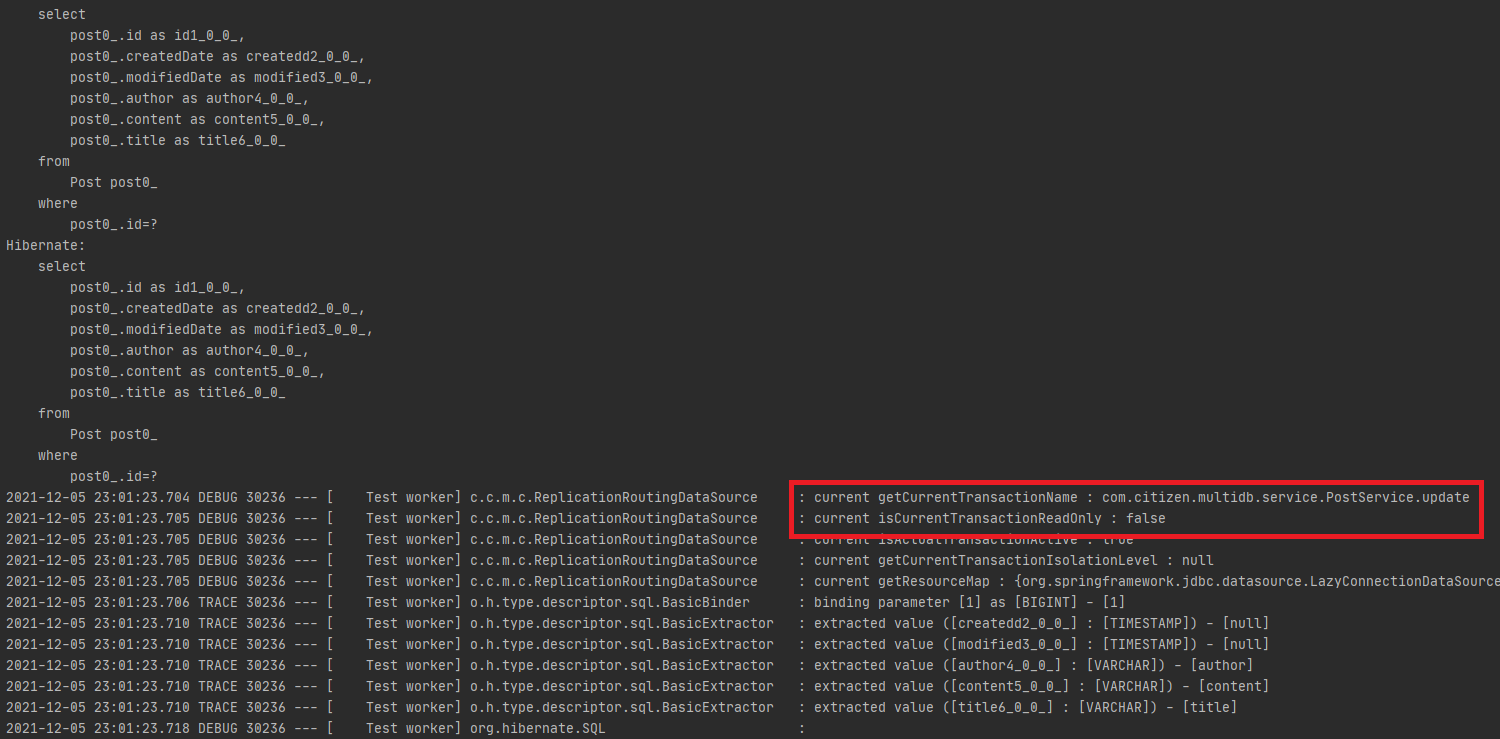
먼저 getCurrentTransactionName을 보면 PostService.update로 되어있고, isCurrentTransactionReadOnly이 true로 찍히는 것을 확인할 수 있습니다.
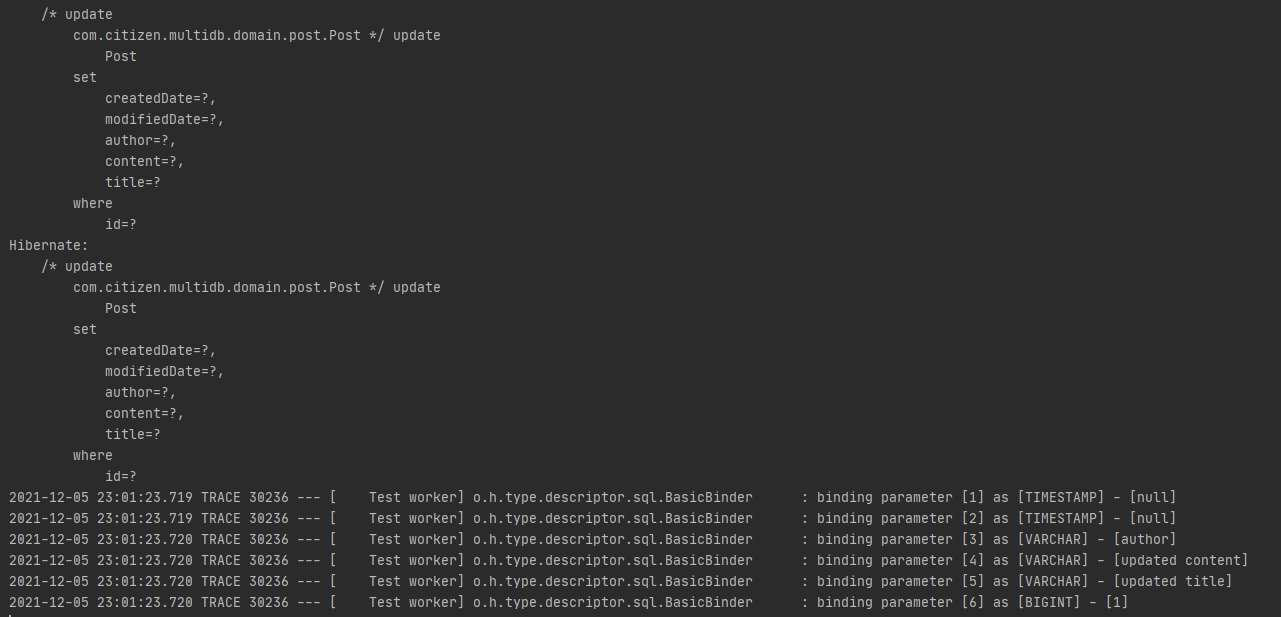
그리고 그 밑에는 update 쿼리가 찍혀있는 것을 볼 수 있습니다.
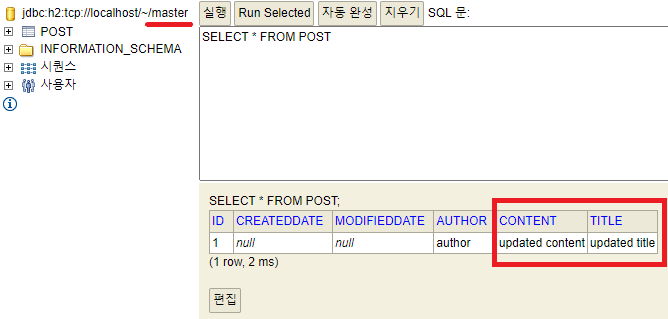
DB에서 테이블을 조회하면 Master에서만 데이터가 변경된 것을 확인할 수 있습니다.
마무리
이로써 @Transactional과 readOnly로 Master/Slave DB 분기처리, 테스트코드와 테스트까지 확인해봤습니다. 이젠 사용법에 대해선 숙지했으니, 다음번엔 내부 실제 동작이 어떻게 돌아가는지, 제가 Spring Batch에서 ReplicationRoutingDataSource를 활용해보고자 실패했던 것과 함께 포스트를 남겨보도록 하겠습니다.
첫 개발 관련 포스트였는데, 부족한 제 포스트를 읽어주셔서 감사합니다.
날씨도 춥고, 코로나도 다시 기승인데 항상 건강 조심하시고 행운이 가득하시길 바랍니다~ 👍
댓글남기기